

Introduction
If you’re just picking up a hook and yarn for the first time, welcome — you’re about to learn the single most important stitch in all of crochet: the chain stitch. Every crochet project you’ll ever make, from a simple dish cloth to an intricate lace shawl, starts with a foundation chain built from this one basic move.
The good news? The chain stitch is genuinely one of the easiest stitches to learn. Once your fingers get the rhythm down, you’ll be able to chain without even looking — and that muscle memory is the foundation (literally) for every stitch that comes after it: single crochet, double crochet, half double crochet, and beyond.
In this tutorial, I’ll walk you through exactly how to make a chain stitch, step by step, along with the mistakes beginners make most often and how to fix them.
Etsy Shop
What Is a Chain Stitch in Crochet?
A chain stitch (abbreviated ch in patterns) is a simple loop of yarn pulled through another loop, repeated over and over to create a chain — much like a friendship bracelet or a daisy chain, but made with a crochet hook instead of your fingers.
Chain stitches are used for two main purposes:Foundation chains
-
- — the starting row of stitches that everything else in your project is built on top of
-
- Spacing and shaping — chains are also used within rows and rounds to create gaps, turn corners, and add height when moving to a new row
What You’ll Need
-
- A crochet hook (a 5.0mm/H-8 hook is a great size for practicing)
-
- Worsted weight (medium) yarn in a color you can see clearly
-
- A slip knot already made on your hook (this is your starting loop)
How to Crochet a Chain Stitch: Step-by-Step
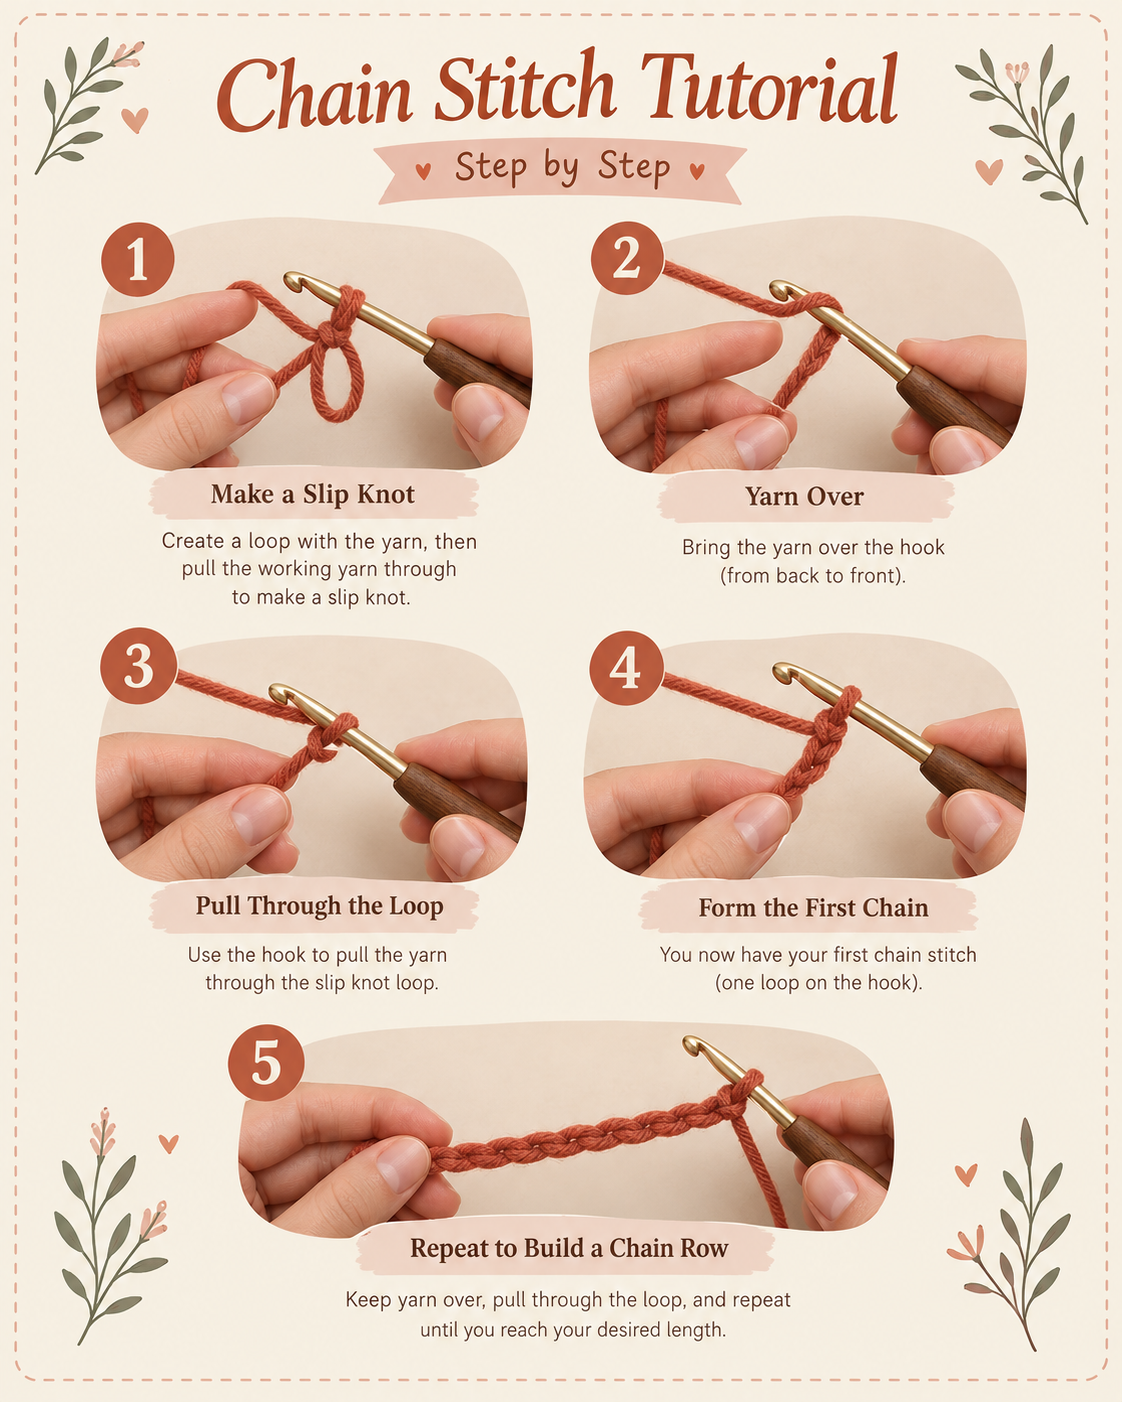
Step 1: Start With Your Slip Knot on the Hook
Before you chain, you need one loop already on your hook — this is your slip knot. Hold the hook in your dominant hand like a pencil or a spoon, and hold the base of the slip knot with your other hand to keep tension on the yarn.
Step 2: Yarn Over
“Yarn over” simply means wrapping the working yarn (the strand connected to your ball or skein) over the hook from back to front. This creates a new loop resting on your hook, in addition to the loop already there.
Step 3: Pull Through
Using the hook, pull that new yarn-over loop through the loop already on your hook. As it passes through, the old loop slides off, and you’re left with one new loop on your hook.
Congratulations — that’s one chain stitch complete!
Step 4: Repeat
Yarn over again, pull through the loop on your hook, and repeat this motion as many times as your pattern calls for. Keep your tension gentle and even; chains that are too tight will be hard to work into later, and chains that are too loose will look uneven.
Step 5: Counting Your Chains
When counting chain stitches, don’t count the loop currently on your hook or the original slip knot — only count the completed “V” shaped links hanging below it. Most patterns will tell you exactly how many chains to make (for example, “ch 20”).
Common Chain Stitch Mistakes (and How to Fix Them)
Chaining too tightly: If you find it hard to insert your hook into the chain on the next row, you’re probably chaining too tight. Try using a hook one size larger just for your foundation chain, or consciously relax your grip.
Losing count: It’s easy to lose track of how many chains you’ve made, especially past 20 or 30. Try using a stitch marker every 10 chains, or count out loud as you go.
Twisted chains: If your chain looks twisted rather than flat, you may be turning your hook as you pull through. Keep the hook’s face pointing toward you throughout the motion.
Accidentally chaining into the wrong loop: Each chain stitch has a front bump, a back bump, and a top loop. Getting comfortable identifying these will make your next stitch — usually a single crochet into the chain — much easier.
What Comes Next?
Once you’re comfortable with the chain stitch, you’re ready to build your first real project. A simple dish cloth or scarf worked entirely in single crochet is the perfect next step, since it lets you practice your foundation chain and reinforce the rhythm before moving on to more advanced stitches.
Want the full step-by-step written pattern with stitch counts for a beginner-friendly project using nothing but chain stitches and single crochet? [Check out the printable PDF pattern in my Etsy shop] — it includes clear photos for every row and a finished-size guide so you know exactly what to expect.
Frequently Asked Questions
What does “ch” mean in a crochet pattern? “Ch” is the standard abbreviation for chain stitch. When a pattern says “ch 15,” it means make 15 chain stitches.
How do I know if my chain stitch tension is correct? A good rule of thumb: your finished chain should lie flat, and you should be able to easily insert your hook into each stitch without tugging or stretching it.
Do I need to chain the same way for every project? Yes — the chain stitch technique itself doesn’t change, but the number of chains you make will vary depending on the pattern and the width of the project you’re making.
Can I practice chain stitch without starting a full project? Absolutely. Many crocheters practice by simply chaining a long length of yarn with no end goal — it’s a great way to build muscle memory and get comfortable with tension before starting your first real piece.
Pin this tutorial for later, and tag me if you give it a try! 
